Posts

Showing posts from March, 2024

Rescue.

Image
At the Ally Pally show, I bought this Roco VTG Ferrywagon from Ellis Clark Trains, along with another wagon. I went and got a cuppa and sat down, took it out of the box and found the chassis was severely bowed. Not expecting a positive response, I took it back, but no, the gentleman I bought it from remembered me and when I showed him the problem, refunded my money without quibble. I promptly bought another item with the money, he put the van in the bin, thought for a minute and then said I might as well have it as it would only get chucked away, "see what you can do with it"! Needless to say, I can heartily recommend Ellis Clark Trains! I took the wagon apart after a few days, and found the problem was due to the weight, which is a casting fitted in the centre of the floor, having cracked, swollen and distorted, pulling the chassis put of shape. Mazak rot, probably. The weight came away easily, breaking into two halves, but the chassis was still bowed. After a bit of ponderi...

Bagger.

Image
These seem to have been quite common both sides of the Intra-German Border. Basically a relatively lightweight, rubber tyred, small crane, rather different from, say, a JCB or Coles Crane in the UK, though I have seen one or two similar devices here. They have a wide variety of uses, often picking up scrap for loading/unloading or agricultural products such as sugar beets. While the open wagon this example is about to start unloading carries coal, I'm not sure how typical "bagger fodder" that is, it'll have to do for now as it's the only loaded open wagon I have. Both sides? Yes, this example is from the DDR. I also have a Kibri kit for a West German one, but have yet to assemble it. I don't know whether this type of bagger was exported from East to West (at least, pre 1989), if not then I'll have to build a DR layout as well!

3 Way.

Image
So far in my German railway modelling, I have only used Peco Setrack, as it was what I had. Yesterday, I was at an exhibition and bought a couple of Roco Line points for a bargain price, to see how they compare with Peco. There's a whopping great curved point, but what really interests me at the moment is this 3-way. The curves seem to be about equivalent to Peco 2nd radius, but it could still form the nucleus of a small layout, perhaps in an APA box or similar. Not sure about the big boxes for switching on the sides; these incorporate springs so you can run against the point (may be useful) but don't look great. I'll have to investigate means of hidden actuation, I'm sure such exist. James Hilton has recently featured a couple of excellent small European themed schemes for H0 on his blog, here: https://paxton-road.blogspot.com/2024/02/kohlenbachbruke-eastern-european.html and here: https://paxton-road.blogspot.com/2024/03/commission-european-secondary.html and although...

Blockage.

Image
 290 110 and its short train of empties blocks the crossing at Schinkendorf while waiting to depart. Nobody's worried about this, as none of the waiting vehicles has a driver, and anyway they'll only be stuck behind the tractor 🚜 . What's a heavy shunter like a 290 doing at a backwater like Schinkendorf? Perhaps deputising for one of the regular engines that's failed, or in test, fresh from overhaul or repair. Actually, I bought the 290, which seems to have been used very little, at Ally Pally last weekend for £50. It is on test following my obtaining the right type of Profi couplings to fit the dovetail style coupler mounts; this both enables and requires a test run to see how it works with stock. Short answer, pretty well so far, even passing the acid test of putting a rake of 4 4-wheeled opens through the sharp reverse curves. This defeated the 212, resulting in buffer locking, though to be fair the latter loco is the only properly close coupled loco I own. Sounds l...

Quantum.

Image
I bought this Piko "Hobby" BR218 from Scograil at the London Festival of Railway Modelling, Alexandra Palace, last Saturday. In order to change the couplings to my preferred Profis, it's necessary to remove the swinging coupler mounts from the bogies. These have a small spring to centre the coupling...and, naturally, when I removed the first mount, the spring, which is held captive between the mount and a hole in the front of the bogie, vanished. Normally when a spring pops out, I have a vague which direction it's gone in, but not this time! A search of the modelling table, followed by a search of the floor, eventually yielded a spring. But not the one that had gone missing...that's silver in colour, the one I found is bronze. So the original spring slipped off to some other dimension, then back again, changing colour in the process. Quantum, obviously 🙄  Meanwhile, back in our reality...what a bargain! Sure, it doesn't appear to have flywheel drive, but it s...

First Outing...

Image
Yesterday's WRG show went well. The layout ran nicely, any problems were largely due to being distracted while operating, mostly by nattering to my "audience" and running against points or whatever. One oddity is the when pulling more than two open wagons from the loading siding by the platform with the BR212, the leading wagon derails on the loading dock points. This doesn't happen with the Köf 3, I suspect the sharp curve of the point combined with a lack of weight in the wagons, and perhaps nearing the limit of swing of the close coupler mechanism on the 212 may all be contributing factors. I ran pretty much all my stock yesterday and this was the only combination that gave problems. I continue to be impressed with the performance of Profi Couplings and close coupling mounts. Once I've put the layout up at home again, I'll experiment with adding weight to the opens, I intend to load them anyway so it's no problem.  Thanks to all concerned for organising...

Well Stacked.

Image
One of the basic features of the whole "build a layout while preparing to move" thing was the ability to pack everything for storage or transport quickly, easily and for it to be well protected.  The layout itself sits in two 22litre Really Useful Boxes that are sold for storing wrapping paper.  Below these two is an excellent stock box sold by Trainsporters...I'll come back to this as I think it deserves a post to itself. At the top is a box from another manufacturer, bought as I couldn't obtain another 22l RUB. This contains the fiddlestick, Peco Loco Lifts, tools, meter, soldering iron, H0 cars, the 798/998 railbus, KLV and class 212 in their boxes as well as loco and track cleaning stuff. Now to put it in the car...   

Tomorrow...

Image
...is the Wealden Railway Group Personal Layout Show at Steyning. This morning, I have a few final bits and pieces to do, then pack the layout and stock etc. Whether it'll ever go to another show is anybody's guess...there's a high likelihood that its next trip out of the house will be in a removal van, and I have no idea how things will pan out once we've moved.  For now....

Lights...

Image
Platform lamp posts were needed. I'd picked up an old Kibri kit for a level crossing, this included rather basic mouldings for 2 non-working lamp posts of a suitable type, but these lacked diffusers, so after a little thought, I found the window glazing sprue from the same kit, checked the sprue diameter and found it was about the right diameter to make diffusers from, and had a useful elliptical cross-section. I cut two bits of sprue lengthwise with a razor saw, sanded the flats smooth, then sanded the ends to a half-dome shape. The resulting diffusers were then attached to the lamps using Revell Contacta Clear, which worked very well. The photos show the process, and the finished lamp posts installed on the layout. 

Verpiss dich, ich habe einen schlechten Tag

Image
 Not me, him... This chap is one of the figures from Faller's 2023 advent calendar. He certainly doesn't look full of Christmas cheer...or perhaps he over-indulged somewhat last night? I've also been "editing" some of the other figures which came in the advent calendar, to make them more suitable for use on the layout. Four of them came in full on 2020s style Hi-viz orange, which isn't really appropriate to Schinkendorf's late '80s setting. I needed a few blokes to work in and around the warehouse, so out came the Games Workshop blue paint with a suitably heroic name which I can't remember. More work needed, but that will have to wait; as it is, these were painted at about 5am today as I woke up early! The ramblers above and to the left of the blue paint jar will probably be fine as they are and can be on the platform waiting for, or having just got off, a train. The two guys between them and the blue (ex-orange) army chaps were both holding tools ...

Mirror, Mirror, on the...Window.

Image
I needed to make some sort of representation of an internal wall for the warehouse building. As it only needed to be pretty basic, I decided to build a door frame out of plastic strip on the bit of thin styrene sheet I'd fished out of the scrap box. I also added a piece of L section strip to represent the division between the doors. Having done that, I felt that a window in each half was a good idea, but didn't want too much messing about for something that will be almost invisible...so I got a piece to baking foil from the kitchen, cut two suitably sized rectangles, and glued them to the doors. I them masked them with tape, painted the whole lot the same colour as the roller shutters and, after a short time for the paint to dry, removed the tape. The result is adequate, looking in the door you can see the reflected light which looks OK. The wall and roof were glued in place, then the building finally permanently fixed to the platform.  

Warehouse.

Image
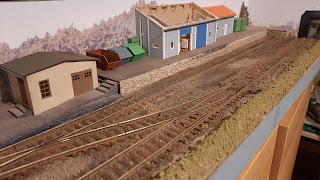
The warehouse and adjacent office building are from a Busch "Commercial Building" kit. It's intended to be a single building with the smaller section at the rear of the larger, but I chose to make it into two buildings (by simply cutting up the card sheet base and not putting the two building halves together), to better fit the narrow layout.  I have painted and (in some cases) assembled several small details to go in and around the warehouse and its loading platform; there's still more I want to add, but it's a lot better than it was. The skips are from kits, I bought these from the Model Railway Club second hand sales along with a few other bits. The smaller building to the left is from an SAI (probably née Auhagen) kit which I built some years ago but never got around to using. The 20' ex-BW containers at the far end are Minitanks (in Herpa packaging but with "Roco" moulded on the bottom...and bought for 50p!) while the steps, slope etc. to the cr...

Planting trees...then pulling them up again.

Image
To balance the buildings at the right hand end of the layout, I wanted to add quite a few trees at the left. Yesterday I planted a number of the trees I'd made the day before, but wasn't happy with the stark contrast between the dark green amd very light green foliage I'd used, so...I pulled up most of the larger trees that had the lighter colour and replaced with darker. While I think this looks a lot better, I will perhaps try adding some other shades. This is how it looks at close of play today:

Painting...and twigs with green stuff on.

Image
With a week to go until the WRG show at Steyning, it's time to add some small details, especially to the area of the warehouse/loading platform.  I had already assembled some skips from plastic kits as well as a couple of Minitanks (ex-) Bundeswehr 20' containers and other stuff. The shelter hut also got a coat of silver paint. I tried to paint the various bits in similar colours to the underlying plastic; that way, the effect of any chips or poor coverage is minimised. The blue and white objects are roller shutter doors for the warehouse.  Another Thing That Needs Doing is to add some trees, saplings, etc., partly to add a bit of depth and disguise corners and odd bits where the backscene didn't quite work out. I bought a Woodland Scenics "Forest Canopy" kit, which consists of small bits of a dead plant which you coat with the supplied glue and then add scatter to represent foliage. I tried this, but found it didn't work for me, so I cut the seed heads off th...

Greening.

Image
Having just over a week until the WRG Personal Layout Show at Steyning, it was time to add some green stuff. The largest area that needed attention was the long, low bank at the front of the layout, I also wanted to add some ground cover in a few smaller areas, like the edges of the level crossing and around the buffer stop at the end of the goods siding.  I'd covered the bright blue foam the bank was carved from in Polyfilla dyed with sepia Indian Ink, this resulted in a sort of beigey colour, so I brushed on a patchy coat of Woodland Scenics Earth base paint. Next was a layer of PVA onto which I sprinkled foam scatter in a light olive green. Hopefully, this will be dry by tomorrow.  I'm pleased with the result so far, it's certainly softened the lines in various places, giving a more natural look.